The answer is they are lost, and your hard work to create your site according to your brand and messaging guidelines and preferences will also be lost. A child theme enables you to create a separate CSS stylesheet and add additional functionality that will not be lost or affected when the parent theme is updated. This can be done manually or by installing a child theme creator plugin. Let’s start with the manual process.
Create a New Directory
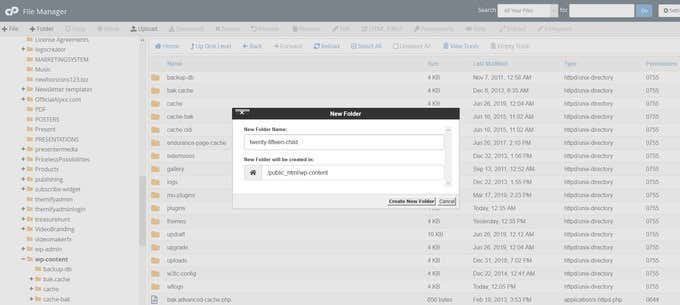
Start by creating a new directory for your child theme. You can use an FTP client or access your existing wp-content/themes directory via your cPanel. To use cPanel, go to your hosting control panel. Select file manager and navigate to the directory where WordPress is installed. This is usually in a directory named public_html. Locate and open the wp-content folder. Click on create new folder and input a name for your child theme. Be sure to give it a name that you will recognize later. A good example is nameofparenttheme-child. Do not include any spaces in your file name to avoid errors. Due to internal handling, the folder name must include the name of the parent theme (theme ‘slug’) as shown in the example below.
Create a CSS Stylesheet
Stylesheets are used in WordPress themes for two reasons.
It is the location of the styles that affect how your site looks.A theme’s main stylesheet is where WordPress looks to find information about the theme.
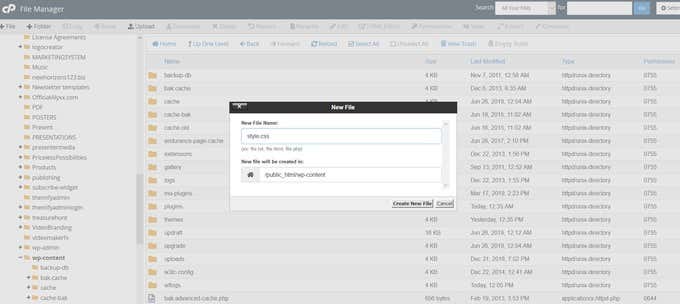
You may not want to add any new styles in the child theme. However, the stylesheet still needs to exist to define specifics such as your theme name and the parent theme name. Therefore, you need to create a new stylesheet for your child theme. So, your next step is to create a text file for the CSS stylesheet that will define the rules that control the look of your child theme. The child theme CSS file will then take precedence over the parent theme. You need to include the following information in your text file:
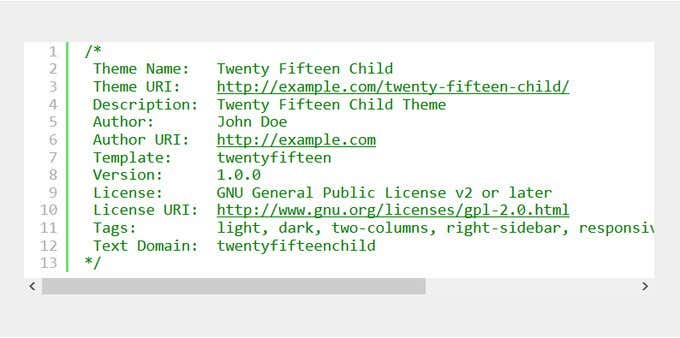
Your theme’s name.The name of the parent theme directory.Title and description that makes sense.
Be sure to include in the stylesheet the following header comment at the top of the file. WordPress will read this information and know that a child theme is being used. You want to pay close attention to the template tag. It tells WordPress what the parent theme of your child is. Note that the folder where your parent theme is located is case sensitive. Technically, you can now activate your child theme. However, if you want to create a more complex child theme, you will need to add custom PHP functions. Create a functions.php file in the child theme (in the same directory as the style.css file you made). This is where things like additional post formats should be added. As with your CSS file, the changes or additions to your PHP file will automatically be merged with or override the parent’s functions. For things like post formats that are added with an add_theme_support(), they act as overrides instead of merges. When using add_theme_support(), you need to take some additional steps to ensure that the child theme overrides the parent. This can get complicated, so refer to the current WordPress Theme Review Team lead William Patton’s post on using WordPress post formats.
Add Styles & Scripts To Override Parent Theme Functionality
Your next step is to make sure your child theme either inherits the parent theme’s features and styles or reflects the new ones you want to use. Styles are used to changing the appearance of your website. Scripts enhance functionality. The way styles and scripts are added to your WordPress site is as essential as the contents of the files. WordPress’ enqueue functionality is how to get this accomplished. Enqueueing refers to the way styles and scripts are added to WordPress sites so that they can affect what users see when they visit your site. Using numerous plugins to achieve the same result often leads to compatibility issues and broken sites. Wp_enqueue not only improves your website’s performance by way of reducing plugin overhead, but it also enhances the user experience.
How To Use ‘wp_enqueue’
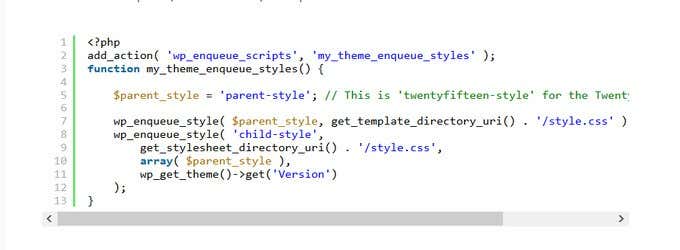
To output the styles for your child theme, you will need to use a function called wp_enqueue_style(). This function takes a few bits of information, but the most important is the name (or ‘handle’) and the location of the file. Inside the functions.php file add the following code. This code adds the stylesheet from the parent directory and then also adds the stylesheet for the child which we created earlier. Note that the parent-style text should match the name of the parent theme with -style added to the end.
Activate Your Child Theme
If you created the files for your child theme on the server inside the wp-content/themes/yourthemename folder, it would then be available in your WordPress dashboard for you to activate.
Log into your dashboard.Go to Appearance > Themes.Your child theme should be listed.Select Preview to see how the site looks with the new child theme.Once you are satisfied with how it looks, click Activate to make it go live.
If you created your child theme somewhere other than on the server in the wp-content/themes/yourthemename folder, then you should zip your new child theme folder.
Log into your WordPress dashboard.Go to Appearance > Themes.Click Add new.Choose Upload Theme.Drag your zipped file to the new box that appears or click the file selector and browse to it on your computer.Once it has been uploaded, then you can preview it and then activate it.
Add Template Files
To override other templates, you can copy them from the parent theme into the child theme. Any template files that have the same name in the child as in the parent act as overrides. Then adjust the contents of the templates as needed. To add new templates, it’s just a case of making a new file with the correct name and adding your own content. The above section explains the manual process. Now let’s go over how to create child themes with a WordPress plugin.
Use a WordPress Plugin
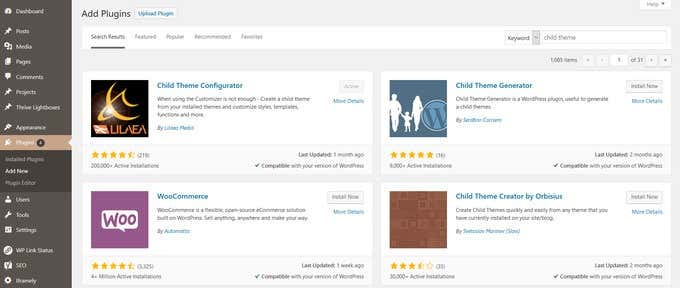
Log into your WordPress dashboard. Click on Plugins > Add New. Search for child theme. The first plugin you will see is the Child Theme Configurator. This is a good choice, as seen in the screenshot above, because it:
Is compatible with the current version of WP.Has a lot of installations.Was recently updated.
Click on Install now > Activate. The next step is to navigate to Tools and then select child themes. Find and select your parent theme from the drop-down menu. Choose analyze to make sure your theme is ok to use as a child theme. Below is a step-by-step tutorial on how to set up Child Theme Configurator. If you decide to use a different WordPress plugin, you can easily find a tutorial on how to set it up as well. As you now know, child themes are distinct themes that rely on their parent theme for some of their functionality. When you use a child theme, WordPress will look for the child before the parent and follow the styling and functionality of the child if it exists. Save yourself a lot of time, trouble, and future headaches when the parent theme updates by creating a child that will not be affected by the update.

