We will walk you through the whole process of setting up Zohomail with cPanel and custom domain. When we look into the way of using third party mail setup Google Apps is the first thing that come into everyone’s mind. But Google App is a paid service. Zohomail is the perfect alternatives to Google App. Talking about alternatives, here are some opensource GitHub Alternative.
Steps to setup Zohomail with cPanel and Custom Domain
Verify your domain ownership with ZohoMail
First, you will need to prove that you are the rightful owner of the domain. To verify the domain ownership with ZohoMail, follow the below instructions:
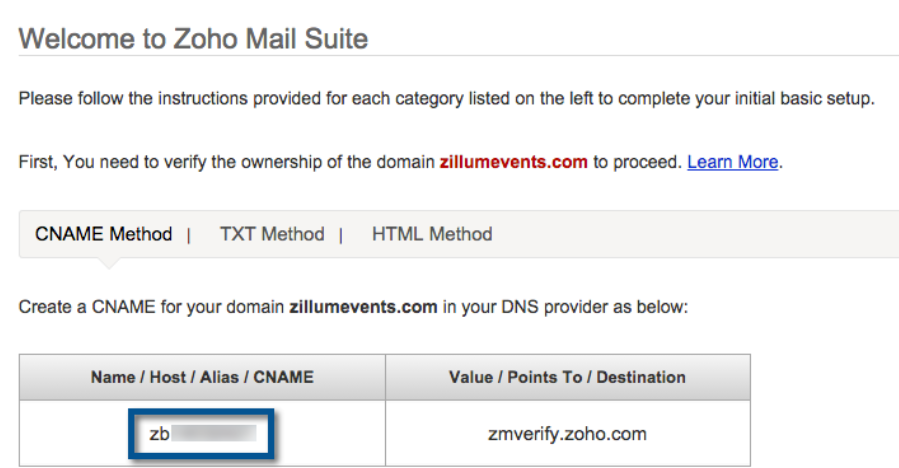
Method 1: Using CNAME verification This is one of the safest method but you will need to give the information in your domain panel. Login to your Zohomail account and from Control Panel » Domains click on the validate icon (!) . It will generate a CNAME code for you. Go to your DNS manager option in your cPanel. Now, select + ADD CNAME RECORD from the shown options. Put the CNAME value in the Name/ Host/ Alias/ CNAME field. Depending on your DNS provider the name of the field will vary. Now in the Value/ Points To/ Destination/CNAME always put this zmverify.zoho.com. Click SAVE to add the CNAME records. Now you can verify if you have setup the CNAME record correctly or not by visiting CNAMECODE.yourdomain.com. Method 2: Using TXT verification This is same as the above method. You will need to generate a TXT code and add it from the DNS zone editor in cPanel. Method 3: Using HTML verification Many will find the above two methods a bit overwhelming hence I am sharing the HTML verification method. First you will need to download a verification HTML page from the Domain Verification menu in ZohoMail dashboard. Now just upload this page into the root directory of your domain. From cPanel just click “File Browser” and go to WWW folder and there you will find www.yourdomain.com directory. After upload is complete press Verify.
After you verify your domain, you will be able to send emails using ZohoMail but you won’t be able to receive any email. To receive email into your zohomail please follow the last step:
Go to your DNS manager option in your cPanel. Now, select + ADD CNAME RECORD from the shown options. Put the CNAME value in the Name/ Host/ Alias/ CNAME field. Depending on your DNS provider the name of the field will vary. Now in the Value/ Points To/ Destination/CNAME always put this zmverify.zoho.com. Click SAVE to add the CNAME records. Now you can verify if you have setup the CNAME record correctly or not by visiting CNAMECODE.yourdomain.com. This is same as the above method. You will need to generate a TXT code and add it from the DNS zone editor in cPanel. Many will find the above two methods a bit overwhelming hence I am sharing the HTML verification method. First you will need to download a verification HTML page from the Domain Verification menu in ZohoMail dashboard. Now just upload this page into the root directory of your domain. From cPanel just click “File Browser” and go to WWW folder and there you will find www.yourdomain.com directory. After upload is complete press Verify.
Change MX record to receive email in ZohoMail
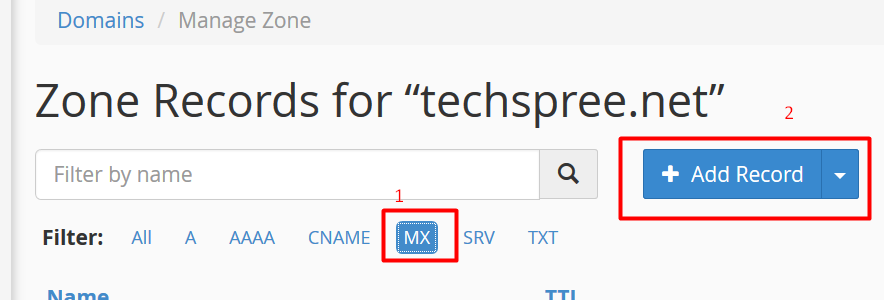
To receive email using cPanel with Custom domain you must change the MX record in the Zone Editor. Click on Manage option. Now select the MX tab. Here you will see just one MX record probably with your own domain. Click on EDIT and change its priority to 40.
Add Zohomail MX record to receive mail
Now what we will do is just add Zohomail record here. Click on the ADD RECORD option and stay in the MX tab. Check the following screenshot for better understanding:
In the NAME field just type your domain name following by dot(.). For example, www.yourdomain.com. the dot in the end is important. TTL 14400 leave it as it is. From TYPE select MX In the priority field , type 10 In the destination field, input mx.zoho.com To make it fail safe, you will want to add two more backup mx records with priority 20 and 30 whereas destination should be mx2.zoho.com and mx3.zoho.com respectively. Now you are all set. Now you can both send and receive emails using your custom domain. We used cPanel for the whole process. Zoho is free for up to 10 users. So for personal email usage, this is more than enough. For enterprise solution, you will have to pay some bucks!! Hey, there is no such thing like “Free Lunch” 😉