Ideally, a wireless connection should allow you to transfer documents easily from your device to the printer, but it’s not always that simple in reality. Knowing how to troubleshoot wireless printer issues can relieve some of that frustration. We’re going to cover some fixes that’ll help you work through most of them below.
Troubleshoot Wireless Printer Problems
Check the basics.Set your printer as the default printer.Restart all your devices.Run the Printing Troubleshooter.Check Router settings.Update router firmware.Disable VPN connections.Make printer IP address static.Check Firewall Settings.Change your SSID. Uninstall and reinstall printer driver and software. Uninstall and reinstall the printer.Clear and reset print spooler.Reset your printer.
Check The Basics
It’s possible to overlook some basics so here’s what to check for before moving to advanced steps: You can also perform a System Restore to go back to the default version or settings and try connecting to your printer again.
Set Your Printer As The Default Printer
It’s possible that you’re trying to connect to a WiFi printer that has set itself as the default. Sometimes a printer may install software that has a “virtual” printer so that when you hit the Print command, the virtual printer saves the file instead of the actual document you’re sending to the physical printer.
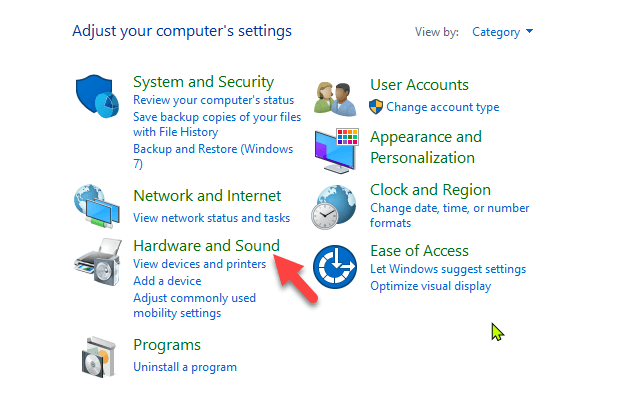
- Click Start > Control Panel > Hardware and Sound.
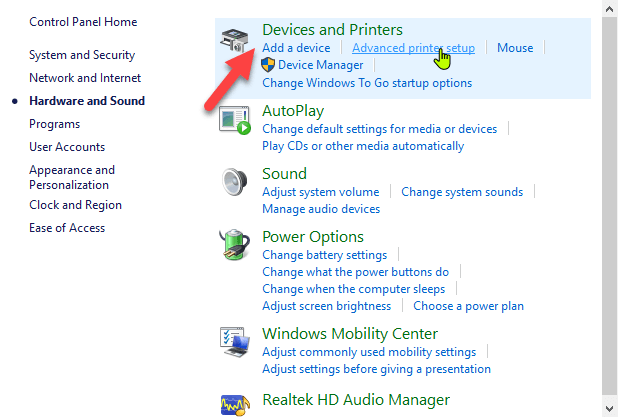
- Click Devices and Printers.
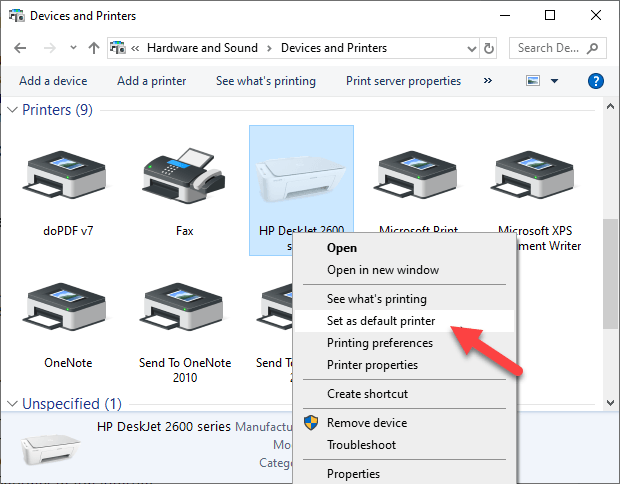
- Right-click your printer and select Set as default printer. Click Yes (or OK) to confirm the action.
Restart All Your Devices
A restart helps fix any software glitches that could cause your wireless printer and connected devices not to work properly together. The wireless printer, router, computer/other device, wireless access point and modem all rely on your home or office network in order to connect to the internet. However it’s configured, if one device acts up, it may affect all the others. A restart can get the network humming again, after which you can try the printer to see if it works.
Run The Printing Troubleshooter
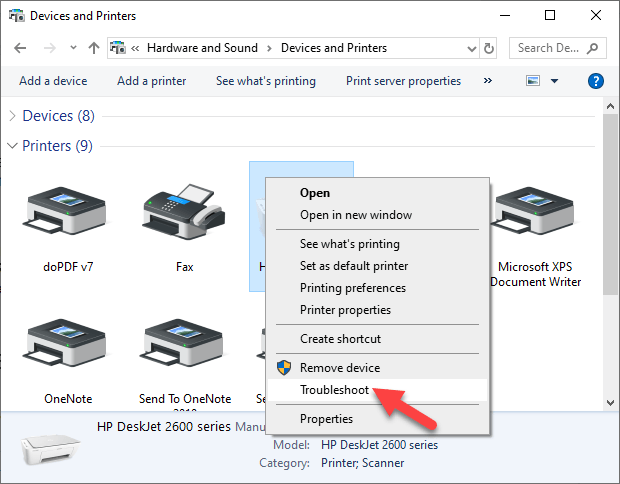
- To do this, open Control Panel > Hardware and Sound > Devices and Printers.
- Right click the printer icon and click Troubleshoot. The printing troubleshooter to identify and fix problems connecting to your printer.
- Alternatively, go to the search box on the taskbar and type Printing problem in, and then select Run Troubleshooter to download the printing troubleshooter. Click Open and follow the on-screen instructions.
Check Router Settings
If you replaced your router recently, you may have to reconfigure the computer and printer to reconnect with your network. The new router may have a different ISP address that needs reconfiguration, and adjustment of router settings, some of which may be unsuitable for your wireless printer. A few things you can check in the router settings include:
MAC address filtering – disable it as it really doesn’t make your network secure. Check if your router is in the 2.4GHz frequency band, which most wireless printers easily connect to compared to connecting to the 5GHz only mode.Use a WiFi channel that’s least used by other local networks. For printers that aren’t connecting, channels 1, 6, and 11 usually work best, instead of the default “Auto” channel selection setting.Disable wireless isolation mode setting and try connecting to the printer again.Enable DCHP to allow your printer to acquire an IP address and communicate over the network, and attempt reconnection.Check that your router, device or printer has a guest connection, as this isolates them from other devices on a network, and prevents your wireless printer from connecting.
Update Router Firmware
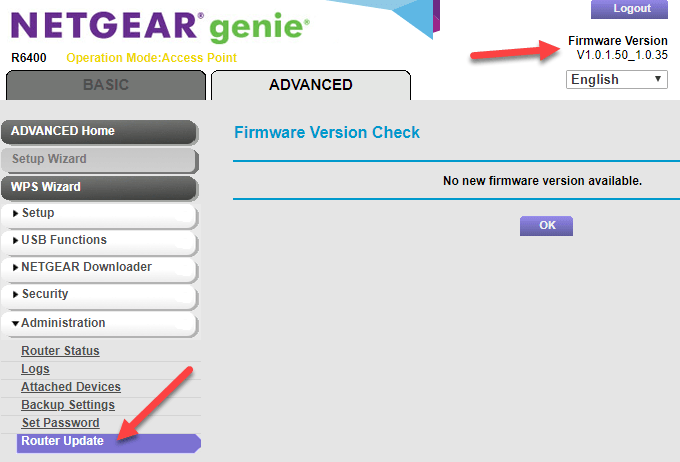
If changing the router settings didn’t help, update its firmware to address bugs or vulnerabilities and connectivity issues. For example, moving to Windows 10 from a different version could create an interruption to your connection, which a firmware update could solve. Check your router’s manual or consult the device manufacturer for further instructions as the steps may vary with different routers. Some may also require special instructions to connect to wireless devices, especially those provided by ISPs.
Disable VPN Connections
If you’re using a virtual private network to connect securely to a remote network, it could restrict you from printing through your WiFi printer. This happens for security reasons, but you can disable the VPN connection and try to connect to the home network and resume printing functions.
Make The Printer IP Address Static
IP addresses can fluctuate in a particular range, whether or not your device remains in the same spot. This can be confusing especially where several devices are attempting to connect wirelessly over a given duration. In this case, check your router’s manual for instructions on how to set a static IP address for your printer so that it won’t change with time.
Check Firewall Settings
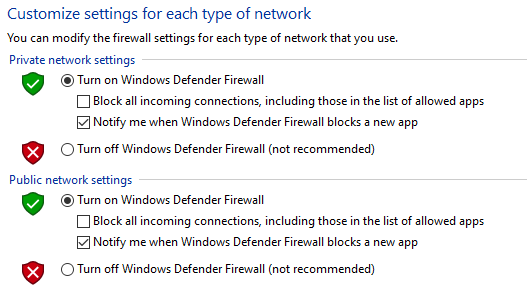
Your device’s firewall is designed to block any attacks from malware, but it could also block network settings for printing. It could be overprotective of your device depending on how it’s configured, and won’t let it see your printer over the local network. Firewall settings vary though, in which case you should check the user guide or vendor’s website for support resources. Make sure you keep your software up-to-date, set firewall settings to medium or “Trusted Zone” where your device is connected to a network, and enable it to show all alert messages. Check that you don’t have multiple firewalls enabled at once as this causes several wireless printer connection issues or you may find your wireless printer not printing.
Change Your SSID
Changing the name of your WiFi network (SSID) may solve connectivity issues. If there are multiple routers with a similar SSID like Home, you can change one of them to make it recognizable by your printer and resolve connectivity errors due to drops in connection or incorrect wireless connection. Doing this means you have to reconnect a computer system or compatible devices to the right network that the printer is connected to.
Uninstall & Reinstall Printer Driver & Software
This involves reinstalling or reconfiguring your printer’s special network drivers.
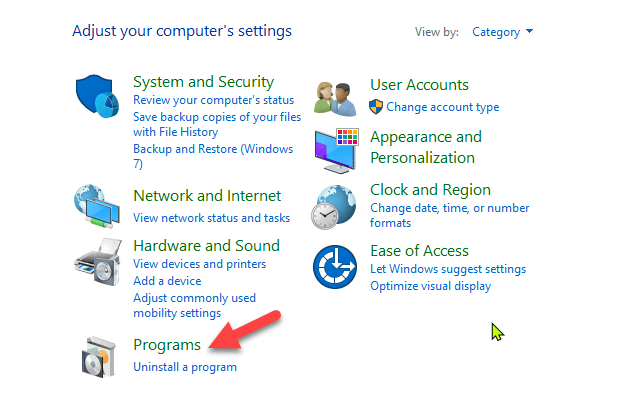
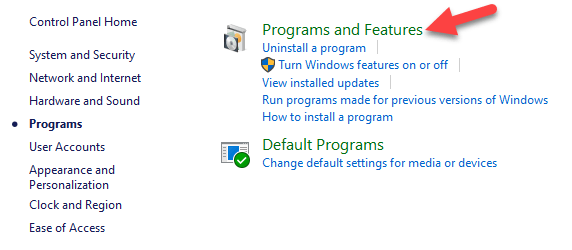
- Open Control Panel > Programs.
- Click Programs and Features > Uninstall a program.
- Click your printer’s name and then click Yes to confirm the action. Turn on the printer and go to the manufacturer’s site to get specific instructions for downloading and installing the drivers for your model. Once installed, follow the steps to set up the printer connection and try printing again. You can also reinstall printer drivers using Windows Update, by clicking Start > Settings > Update & Security and click Check for updates. If an updated driver is available, it will download and install and your printer will use it. Alternatively, use the disc installation software that came with your printer as this may help you install its drivers or check for driver updates.
What If The Printer Driver Doesn’t Install?
- In this case, click Start > Settings > Devices.
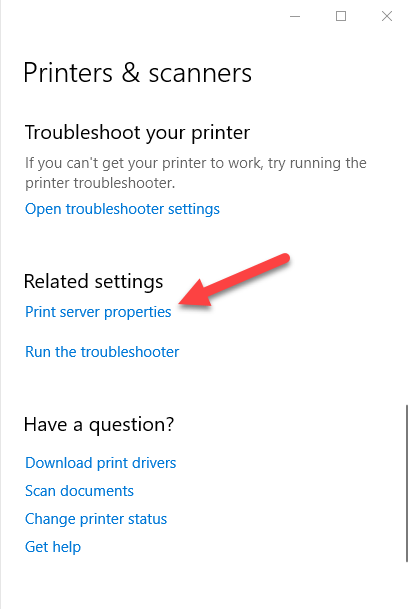
- Click Printers and Scanners and then click Print server properties under Related settings.
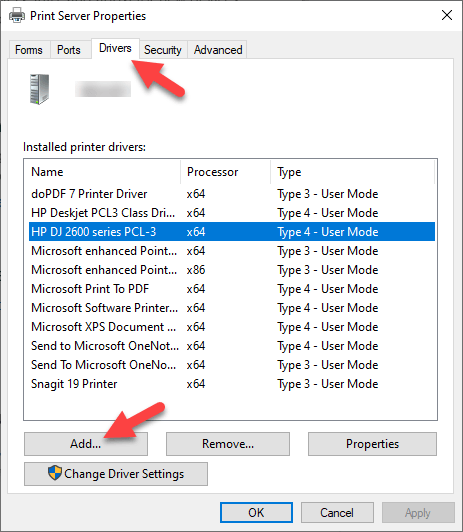
- Go to the Drivers tab and check for your printer. If it’s there, you’re good to go. If not, click Add.
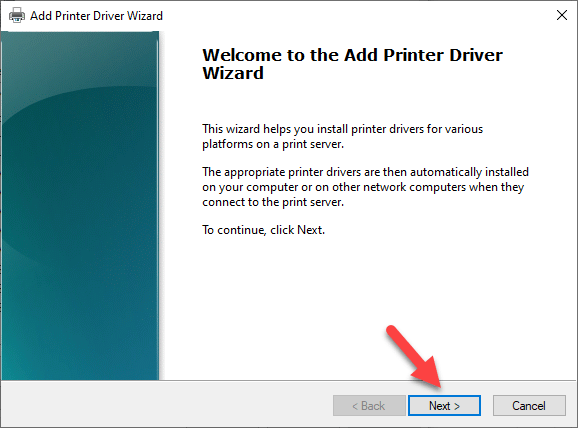
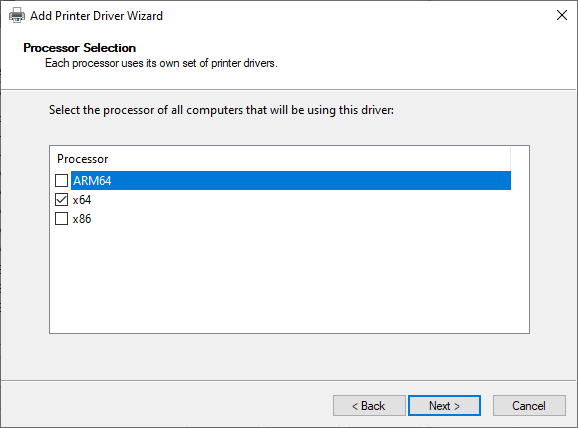
- Click Next in the Welcome to the Add Printer Driver wizard
- Click on your device’s architecture in the Process Selection box, and click Next.
- Under Printer Driver Selection, click your manufacturer, select the printer driver, and then click Next > Finish. Follow the on-screen steps to add your printer’s driver. Note: If no new drivers are available, contact the manufacturer and ask when they’ll be available. If your printer model is no longer supported, you can check with a printer in the same series for updated drivers as there’s a likelihood they’ll work for yours, with some loss of functionality though. It’s a long shot, but there’s not much to lose if it’s not working already.
Uninstall & Reinstall The Printer
Try to remove your printer and reinstall it to see if the connection will work for it to print again.
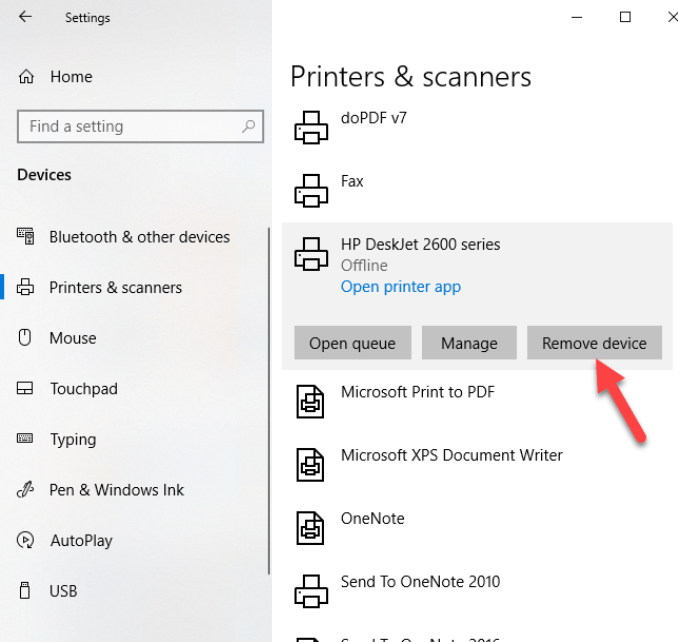
- To remove the printer, click Start > Settings > Devices. Click Printers and Scanners and find your printer, click on it and select Remove device.
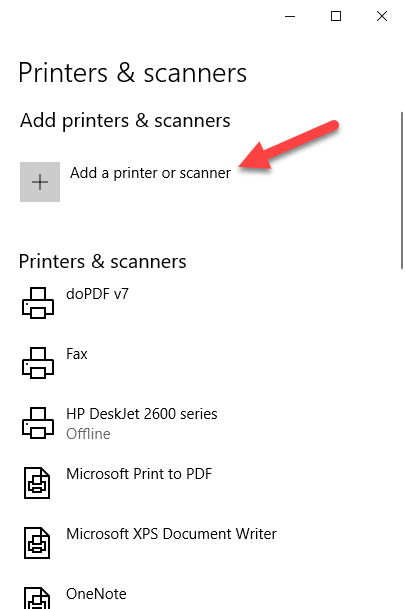
- Reinstall the printer by clicking Start > Settings > Devices > Printers and Scanners. Select Add a printer or scanner.
- Choose your printer from the list of available ones (including Bluetooth or printers connected to another computer and shared on your network) and click Add device. Note: If you use an extender, wireless access points, or multiple routers with different SSIDs, ensure you’re connected to the same network so your device can find and install your printer. Print a test page to be sure it works properly.
Clear & Reset Print Spooler
The print spooler manages the printing process. If you find your wireless printer not printing, the print spooler could have a problem. In this case, clear the spooler files and restart the spooler service.
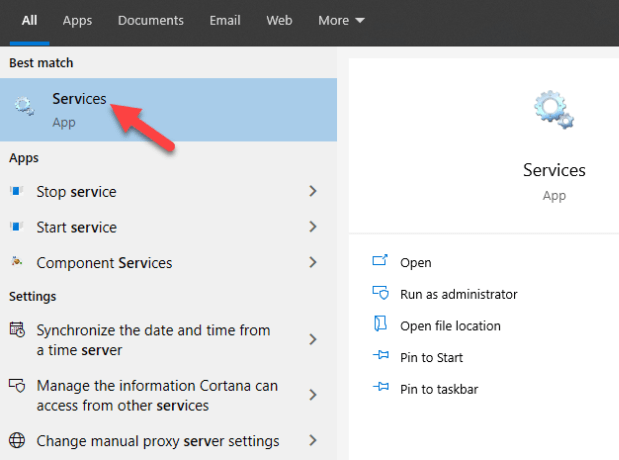
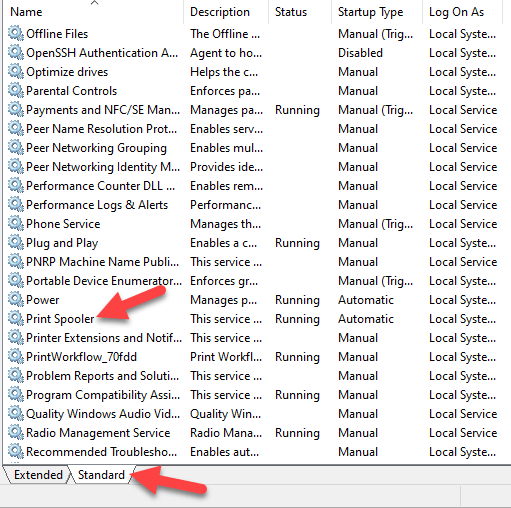
- In the search box, type services and choose Services from the search results.
- Click Standard tab and double-click Print spooler.
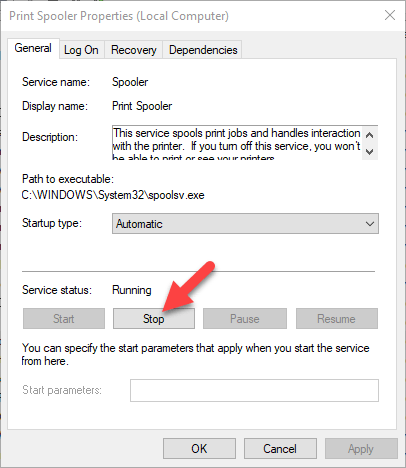
- Click Stop > OK.
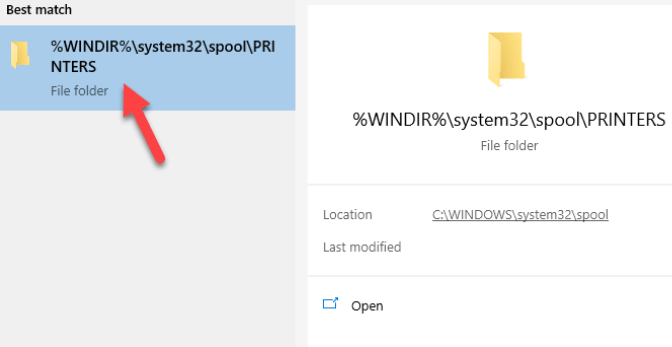
- Type %WINDIR%\system32\spool\printers in the search box again, and then select %WINDIR%\system32\spool\PRINTERS from the search results. Delete all the files in that folder.
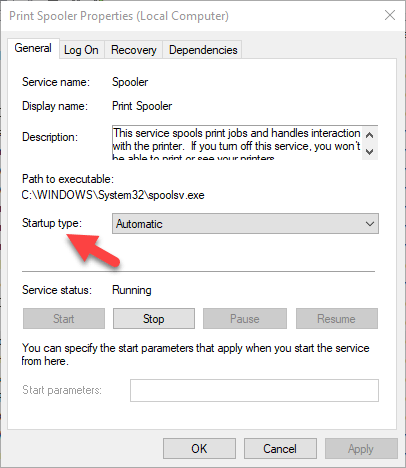
- Type services and select Services. Click Standards tab, and double-click Print Spooler from the list. Click Start and in the Startup type box, select Automatic and click OK.
Reset Your Printer
This is a last resort solution when all other fixes have failed because it clears all your printer settings, including the WiFi login credentials in order to reestablish a connection. Check your printer manual for directions on how to perform a factory reset as the steps vary by brand and model. The information may also be available online if you don’t have an owner’s manual. We’ve covered most probable fixes to wireless printer problems, if yours still won’t connect after going through each of these fixes, you can consult the manufacturer, return it to the store, or buy a new printer and start over.
